Payment Report Overview
Last updated: November 17, 2026
The Payment Report shows the money you recorded as payments, how those payments were applied to your invoices, and your credit memos and refunds in a separate place. It’s built for owners, office staff, and accountants who need collections, applied tax, and adjustment activity in one report.
The report uses the payment issued date for payment tiles and tables, and the issued date on the credit memo or refund for adjustment tiles. Tax on the payment tiles follows the amount applied, so a partially paid invoice shows tax only on the portion that was paid.
To see invoiced sales, use the Net Sales Report. To see what your customers still owe as of a date, use the Accounts Receivable (AR) Aging Report or the Monthly AR Balance Report.
Before You Start
Here are a few things to know before you continue:
To see if you have access to this feature in ServiceCore, please check out this article on user permission levels.
The report pulls your account’s current data, so running it on two different days can return different results if transactions were edited, voided, or deleted in between.
Payment tiles use payment issued date, not invoice date, not service date, and not payment application date. Adjustment tiles use the credit memo or refund issued date.
"Payment - Total Recorded" tile includes payments that were later refunded. Refunds and credit memos appear on the Adjustments tab. Do not add those tiles to "Payment - Total Recorded".
Line-item discounts are already included in the applied taxable amount. Sales tax is calculated after the discount.
Because this report queries your account's current data, running the same report on two different days may return different results if transactions were edited, voided, or deleted between runs. A timestamp in the report header shows exactly when the report was generated.
Key Features
The Payment Report brings payment, invoice, and adjustment activity together in one place. Here is what you’ll find in it:
Report Tabs and Tiles: Two tabs at the top of the report change the tiles you see. “Payments & Invoices” shows recorded payments, applied tax, and the taxable and non-taxable subtotals, next to the full invoice total and invoice tax for invoices that received a payment. “Adjustments” shows applied and unapplied credit memos, refunds, and a total of the three. Credit memos and refunds stay out of the “Payment - Total Recorded” tile so they aren’t counted as collections.
Filtering Options: Filter by issued date, payment doc number, adjustment doc number, customer name, payment status, and more using the “Filters” button.
Report Tables: The report includes Applied Payment Summary for applied amounts by invoice division and payment method, Account Type for applied amounts by account and item, Payment Details for one payment and the invoices it paid, Group by Invoice for one invoice and the payments applied to it, and Payment Adjustments for credit memo and refund records.
Run the Payment Report
The Payment Report lives with your other accounting reports in the Reports section of your ServiceCore account. Run it any time you want to review your collections, applied tax, and adjustment activity.
To run the Payment Report, just follow the below instructions:
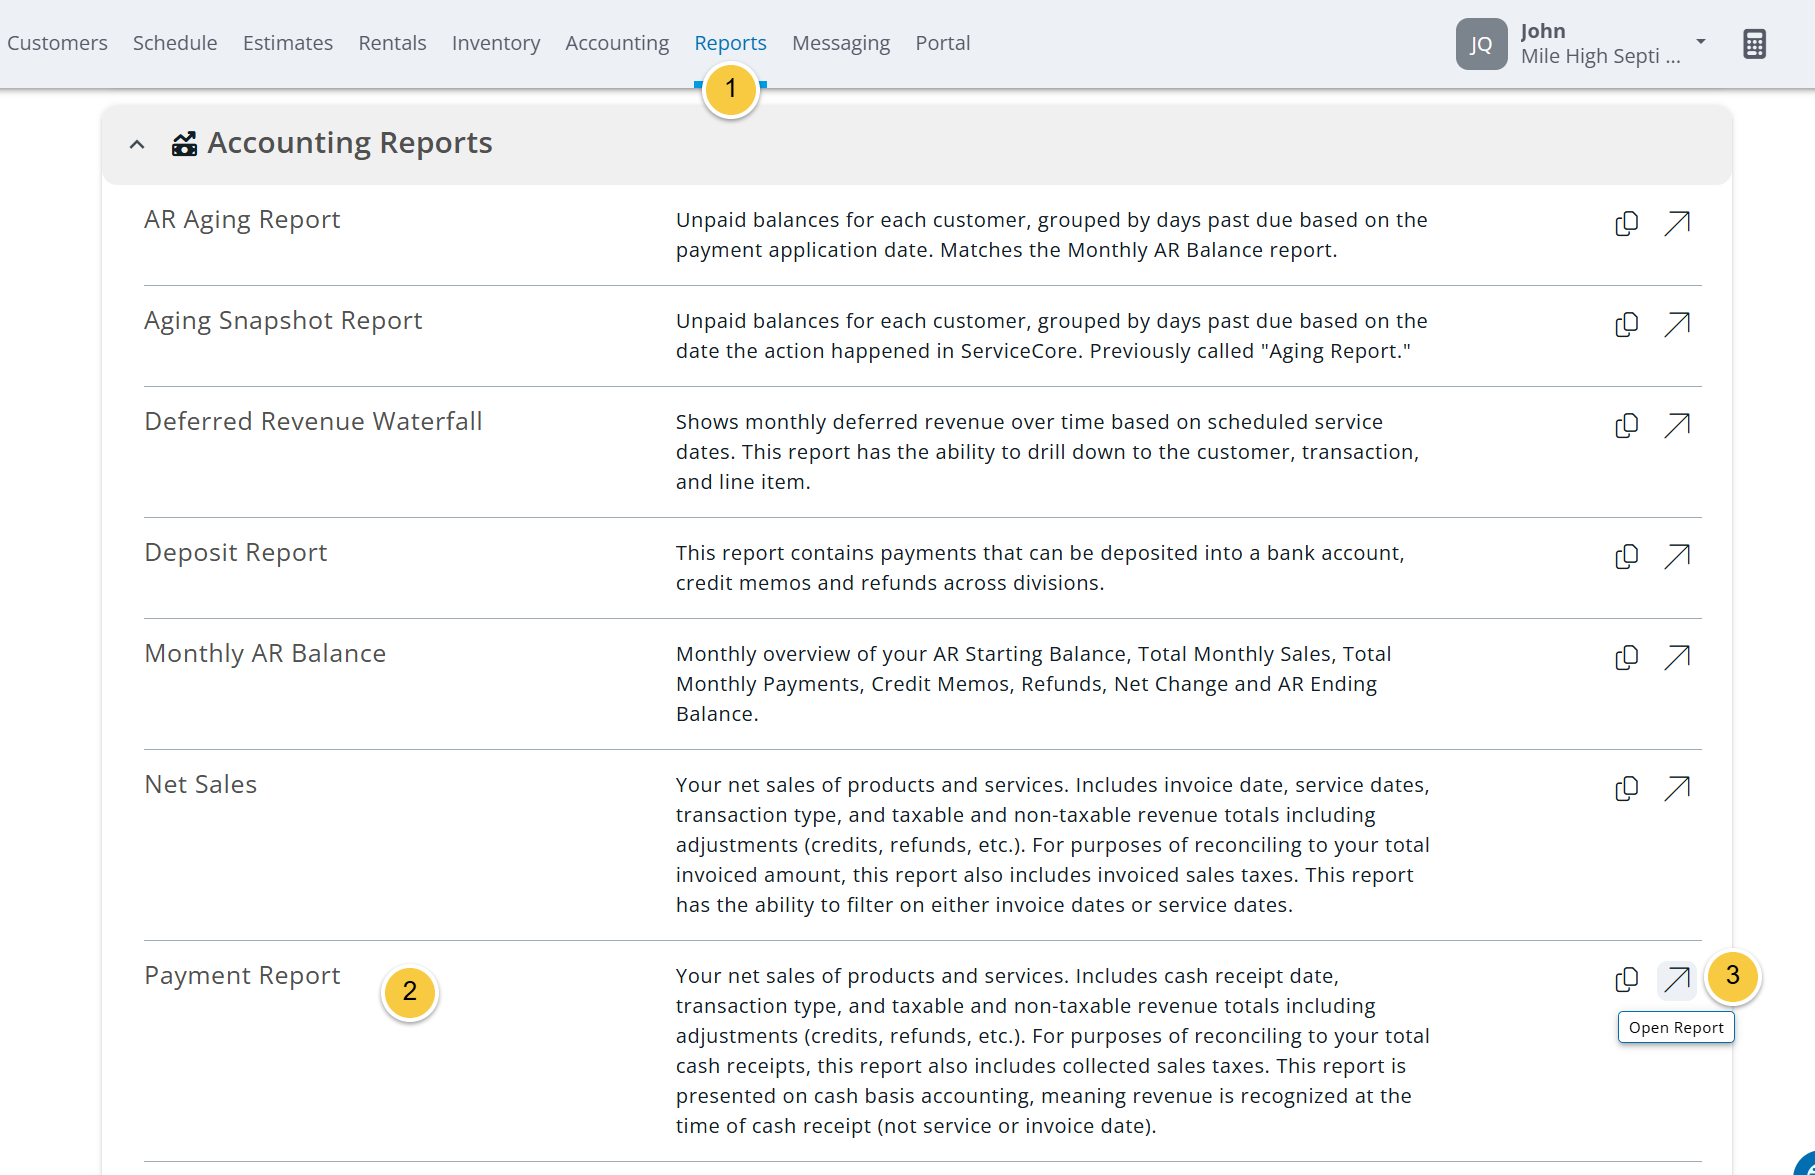
Click into “Reports” in the top menu of your ServiceCore account.
Scroll down and find the Payment Report in the Accounting Reports section.
Click on the name of the report or the “Open Report” icon to run the report.
Report Tabs
The report has two tabs at the top that change the tiles you see. “Payments & Invoices” is selected by default.
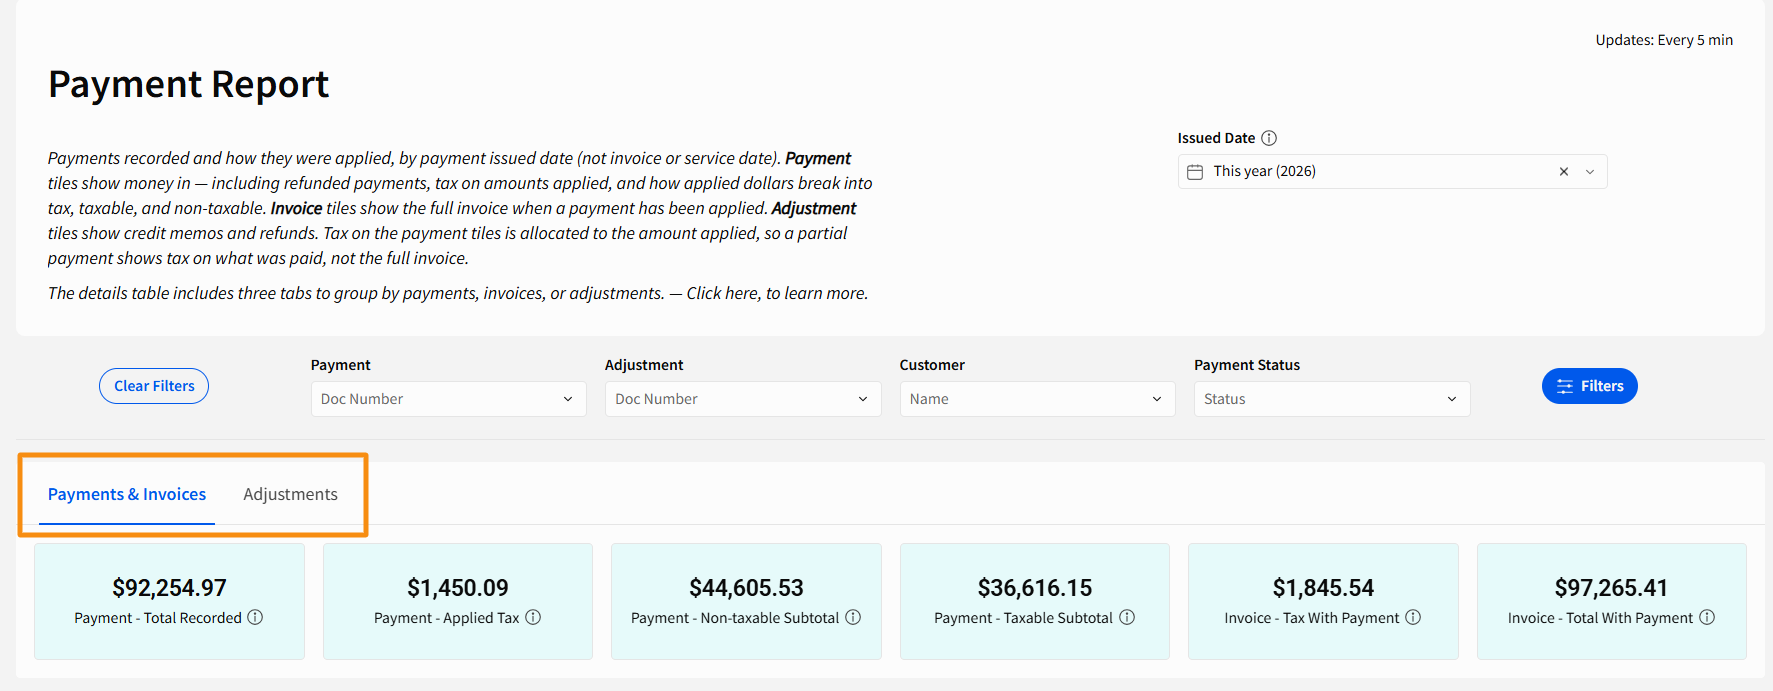
Switching tabs changes the tiles only. The tables below the tiles stay the same.
Payments & Invoices Tab Tiles
The “Payments & Invoices” tab gives you collections and applied tax activity for the dates you select. Hover over the info icon next to a tile name in the report to see a short definition.

The Payment & Invoices tiles are:
Payment - Total Recorded: Money recorded as payments in the issued date range, including tax that came in with those payments and payments that were later refunded. This tile does not subtract credit memos or refunds, which appear on the “Adjustments” tab.
Payment - Applied Tax: Tax on the dollar amounts that were applied to invoice lines, including partially applied amounts.
Payment - Non-taxable Subtotal: The portion of non-taxable line items connected to applied payments, including partially applied amounts. Includes discounts.
Payment - Taxable Subtotal: The portion of taxable line items connected to applied payments, including partially applied amounts. Excludes tax. Includes discounts.
Invoice - Tax With Payment: Total tax on invoices that have a payment applied. This is the full invoice tax for both partially paid and fully paid invoices.
Invoice - Total With Payment: Total invoice amount for invoices that have a payment applied. This is the full invoice amount for both partially paid and fully paid invoices. Unpaid invoices are left out, so this tile will not match totals in the Net Sales Report or the Monthly Accounts Receivable (AR) Balance Report.
Payment - Applied Tax, Payment - Taxable Subtotal, and Payment - Non-taxable Subtotal will not match the invoice tiles when a payment is only partly applied. Those three follow the amount applied. Invoice - Tax With Payment and Invoice - Total With Payment follow the full invoice. See Tax and Discounts below for an example.
TIP: To check your numbers, run the Deposit Report with Transaction Type set to payment, over the same issued date range. The total matches Payment - Total Recorded. The invoice tiles in this report do not match the invoice tiles in the Net Sales Report.
To learn how the taxable and non-taxable amounts are calculated when an invoice is partially paid, see the Tax and Discounts section below.
Adjustment Tab Tiles
The “Adjustments” tab shows credit memos and refunds, which stay separate from your recorded payments. These tiles use the issued date on the credit memo or refund.

The Adjustment tiles are:
Applied Credit Memo Total: Credit memo amounts that were applied as payments.
Unapplied Credit Memo Total: Credit memo amounts still unused in the selected issued date range.
Refunds Total: Total value of refunds, including refund-v2, issued in the selected issued date range. The original linked payment stays in Payment - Total Recorded.
Total Adjustments: The sum of applied credit memos, unapplied credit memos, and refunds.
The tiles show positive amounts to reflect how much credit was applied and how much was refunded. The Payment Adjustments table shows credit memos and refunds as negative values, because they represent money out. That lets you reconcile them against the rows in the Payment Details table. This report does not include a Net Payment or Net Invoice tile. If you want recorded payments after adjustments, add those numbers from the tables.
Applied Payment Summary
The Applied Payment Summary shows the dollar amounts applied to invoices, with one row for each invoice division and one column for each payment method. Use it to see how your collections break out by division and by how customers paid.
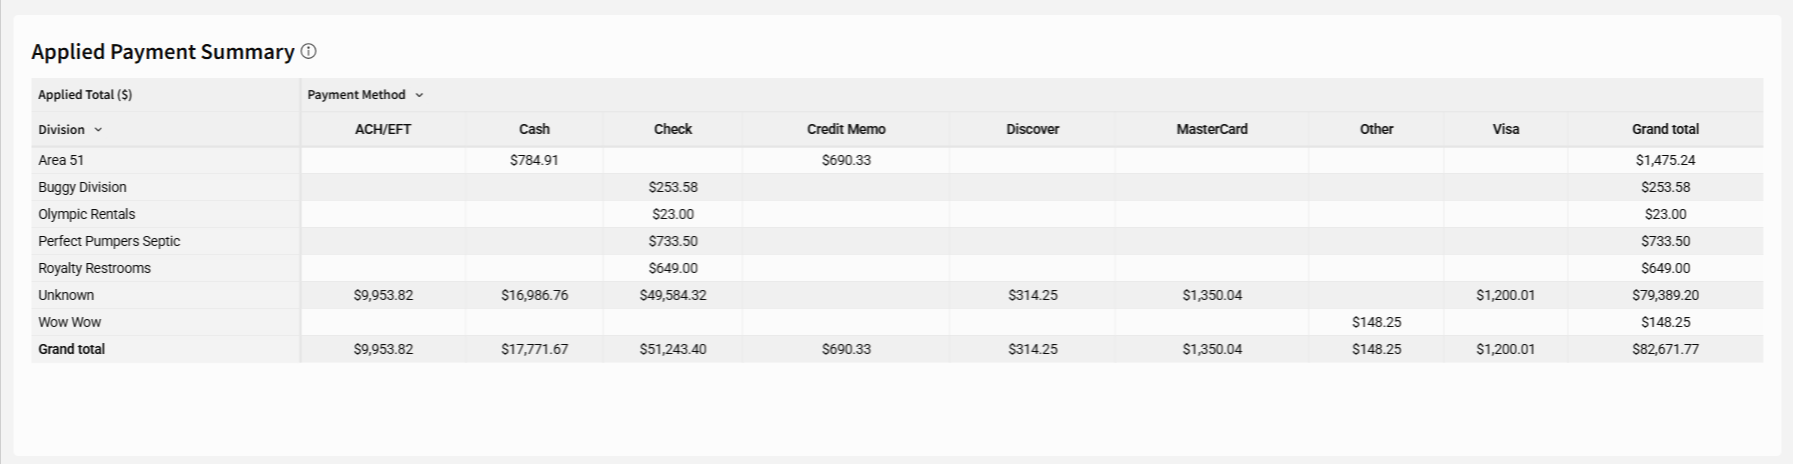
Division comes from the invoice, because the payment record doesn’t have a division of its own. “Unknown” in the Division column means the invoice has no division set. Payments that haven’t been applied to an invoice don’t appear in this table.
Account Type Table
The Account Type table shows applied amounts by Chart of Accounts account and service line item. Use it to see which accounts your collections landed in.
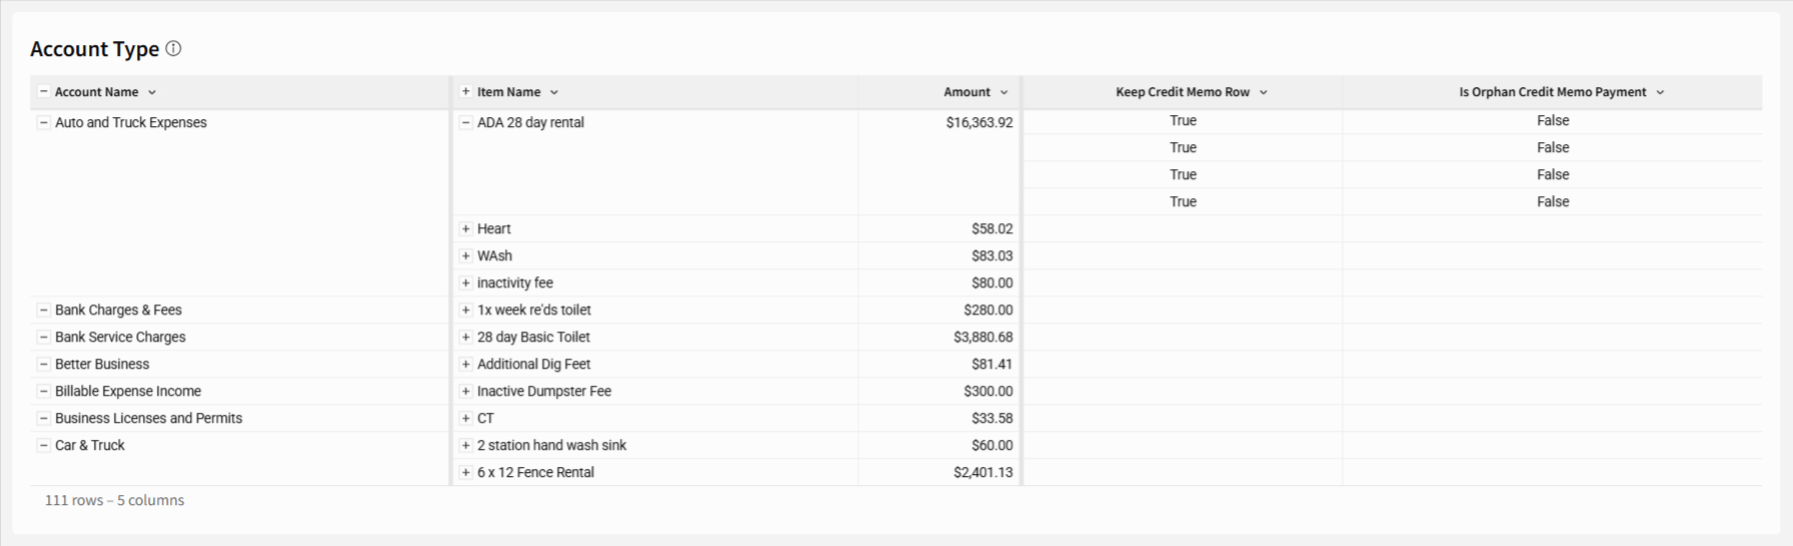
Details Tables Overview
Below the Account Type table, the details table has three tabs. Each tab groups the same activity a different way: Payment Details by payment, Group by Invoice by invoice, and Adjustments by credit memo or refund.
Payment Details Table
Use Payment Details when you want a hierarchical view of payments and the invoices they were applied to. It shows each payment’s total, what remains unapplied, and what was refunded.
Each payment appears once, with every invoice it was applied to listed to the right. The payment columns include Doc Number, Issued At Date, Funding Date, Reference #, Customer #, Customer Name, Payment Method, Status, Total ($), Remaining ($), and Refunded ($). The invoice columns include Invoice Number, Applied to Invoice ($), % Applied, Invoice Issued At, Tax Rate, Taxed Total ($), and Tax Code.
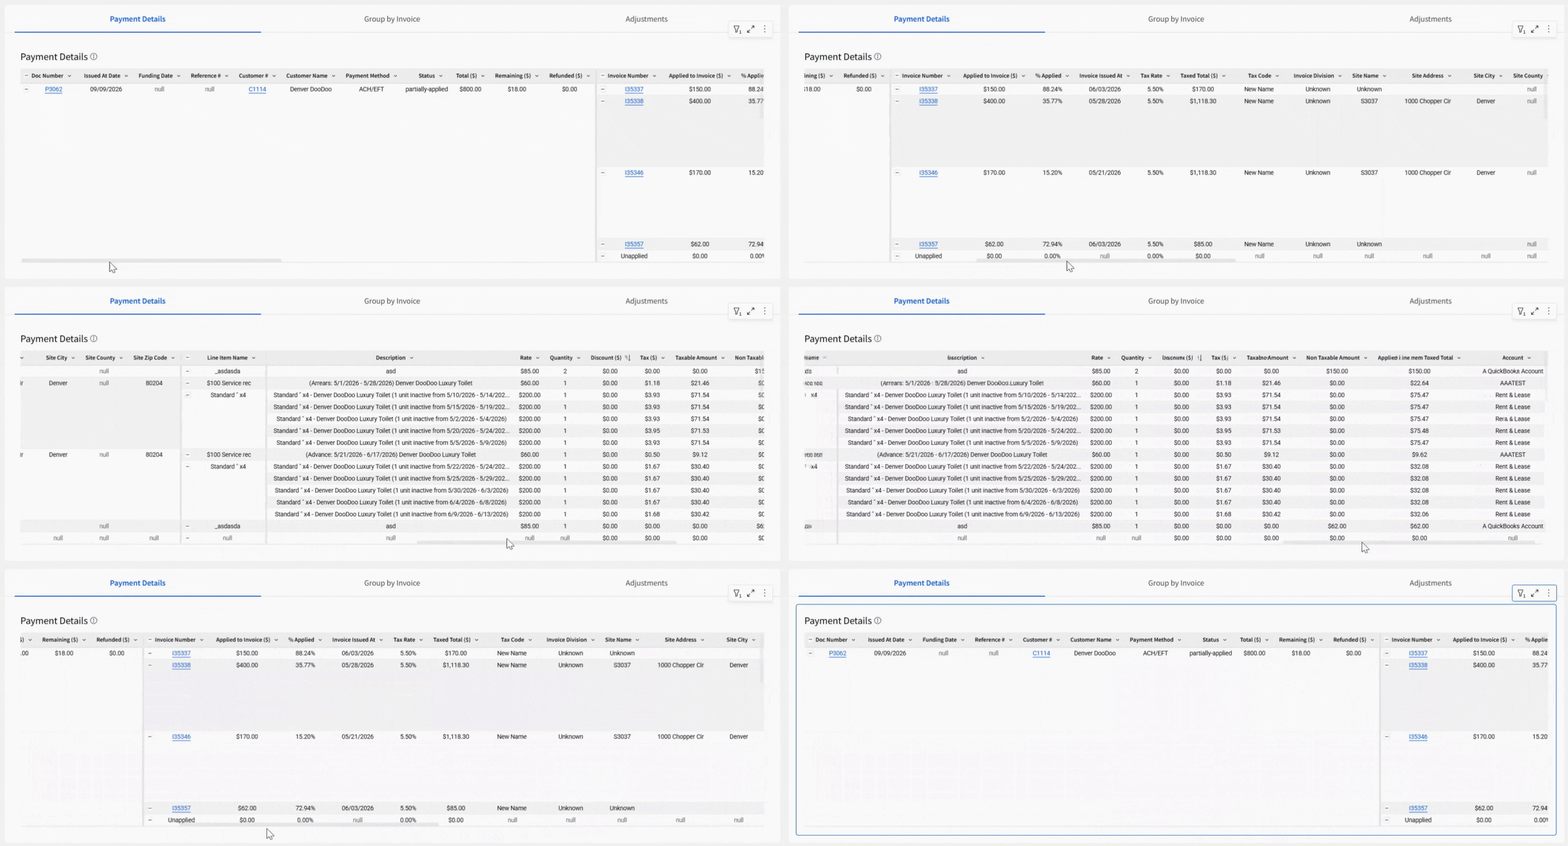
Total ($) shows the full amount of the payment, and Applied to Invoice ($) shows the portion applied to each invoice. A payment that hasn’t been applied, or has been refunded or partly refunded, shows that status in the invoice area.
Scroll to the right to see the site details and the line items on each invoice. The line item columns are Line Item Name, Description, Rate, Quantity, Discount ($), Tax ($), Taxable Amount, Non Taxable Amount, Applied Line Item Taxed Total, and Account.
Group by Invoice Table
Use Group by Invoice when you want to see one invoice and the payment or payments applied to it. It gives you an invoice-based view of how each invoice was paid over time.
Each customer lists their invoices. The invoice columns include Invoice Number, Invoice Issued At, Tax Code, Tax Rate, Invoice Total, Amount Paid, Invoice Paid %, Division, and the site columns.
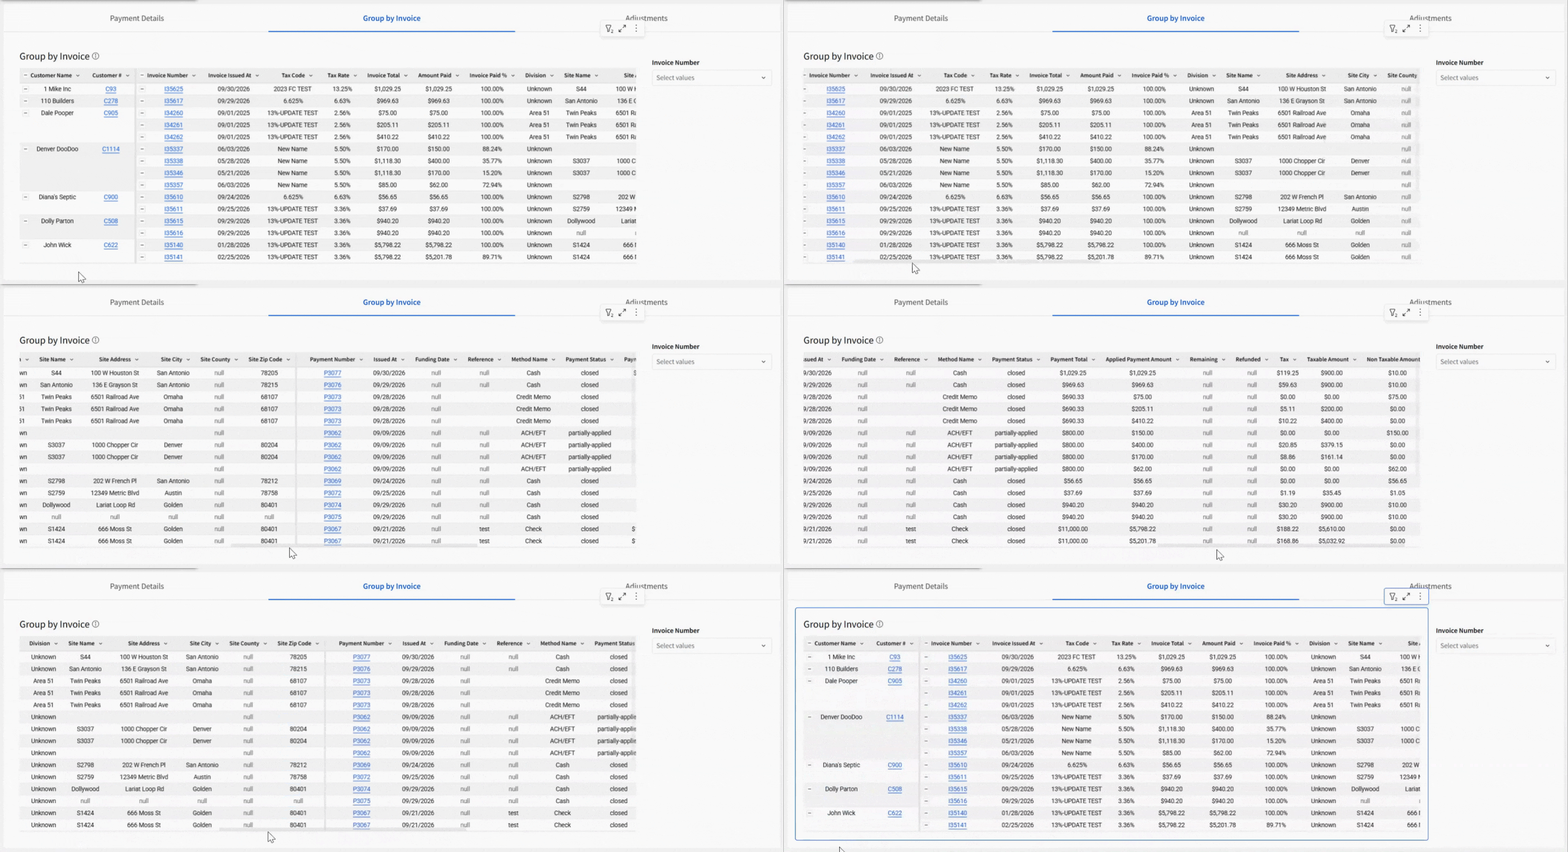
You’ll now see the payments applied to that invoice to the right. Scroll to the right to see columns such as Payment Number, Issued At, Funding Date, Reference, Method Name, Payment Status, Payment Total, Applied Payment Amount, Remaining, Refunded, Tax, Taxable Amount, and Non Taxable Amount.
TIP: Use the Invoice Number filter beside the table to narrow the list to a single invoice.
Adjustments Table
Use Adjustments when you want to track credit memos and refunds alongside the payments linked to them.
This table is grouped by adjustment. The adjustment columns include Adjustment Type, Doc Number, Issued At, Customer #, Customer Name, Status, Net Amount, Tax, Applied, Unapplied, Refund Method, and Division. The linked payment columns to the right include Payment #, Transaction Doc Number, and Linked Amount ($).
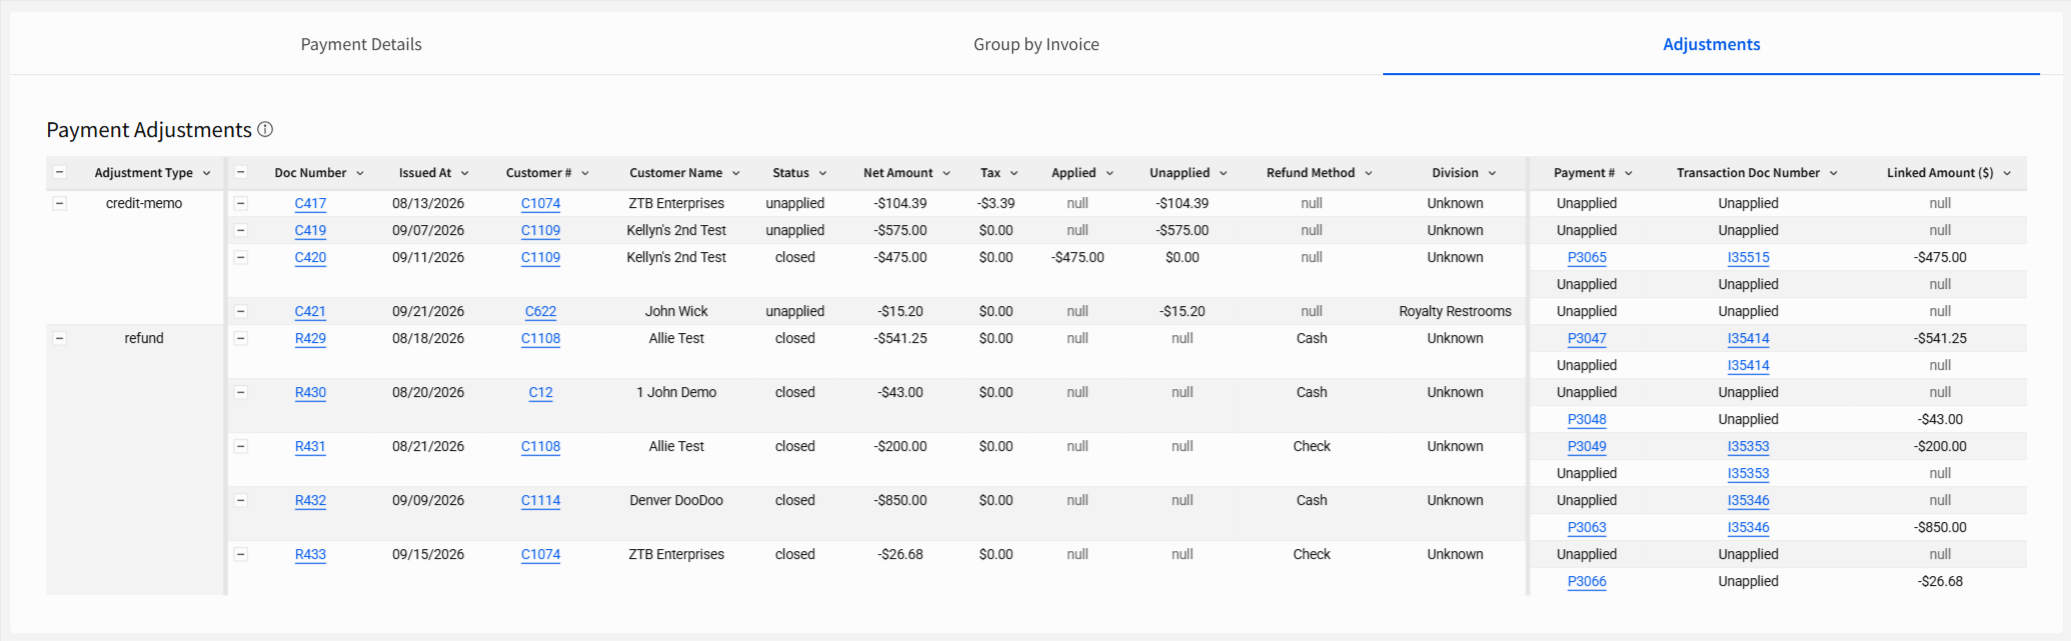
Credit memos and refunds show as negative amounts. “Unapplied” appears in the Payment # and Transaction Doc Number columns for a credit memo or refund that hasn’t been applied.
Tax and Discounts
This report allocates tax, taxable subtotal, and non-taxable subtotal to the amount applied. A partial payment shows those shares of what was paid, not the full invoice.
Example:
Invoice:
Taxable line: $80
Non-taxable line: $20
Tax: $8
Invoice total: $108
Customer pays $54 (half the invoice).
Then the payment tiles show:
Payment - Taxable Subtotal: $40 (half of $80)
Payment - Non-taxable Subtotal: $10 (half of $20)
Payment - Applied Tax: $4 (half of $8)
Those three add to $54, which is the amount applied.
The invoice tiles stay on the full invoice:
Invoice - Tax With Payment: $8
Invoice - Total With Payment: $108
If the same invoice is paid in full, the payment tiles are $80, $20, and $8.
Line-item discounts are already included in the taxable and non-taxable amounts. Sales tax is calculated after the discount.
Parent-level taxes, such as some provincial taxes, are spread across line items along with each line item’s own tax. The applied line item tax is the portion of that combined tax connected to the applied payment.
Filter the Payment Report
Filters help you narrow the report to the dates, customers, and transactions you care about. Filters apply across the tiles and tables on the report.
Set the Issued Date
The Issued Date control limits the payment tiles to payments issued in your date range, and the adjustment tiles to credit memos and refunds issued in that range. This defaults to "This month".
To set the Issued Date, just follow the below instructions:
Click into the “Issued Date” field at the top of the report.
Select the date range you want to see.
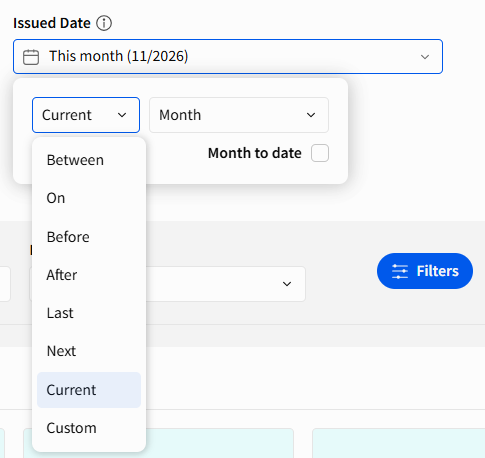
Please Note: The Issued Date is the date the payment was recorded, or the date the credit memo or refund was issued. Changing a payment’s application date or an invoice’s issued date does not move the payment in this report. For example, a payment issued in October still appears when you filter to October, even if you applied it to a July invoice and set the application date to July.
An invoice issued in an earlier month can still appear if the payment was issued inside your date range. A payment issued before your date range does not appear, even if the invoice was issued inside it. Widen or shift the Issued Date range if you need to find it.
Filter Options
The filters at the top of the report let you find one payment, one adjustment, or one customer quickly.

Payment: Narrow to one payment document by Doc Number.
Adjustment: Narrow to one credit memo or refund document by Doc Number.
Customer: Search by customer Name.
Payment Status: Limit the report to a payment status, such as closed.
To use more filters, click on “Filters”. To reset everything, click on “Clear Filters”. Additional filters include:
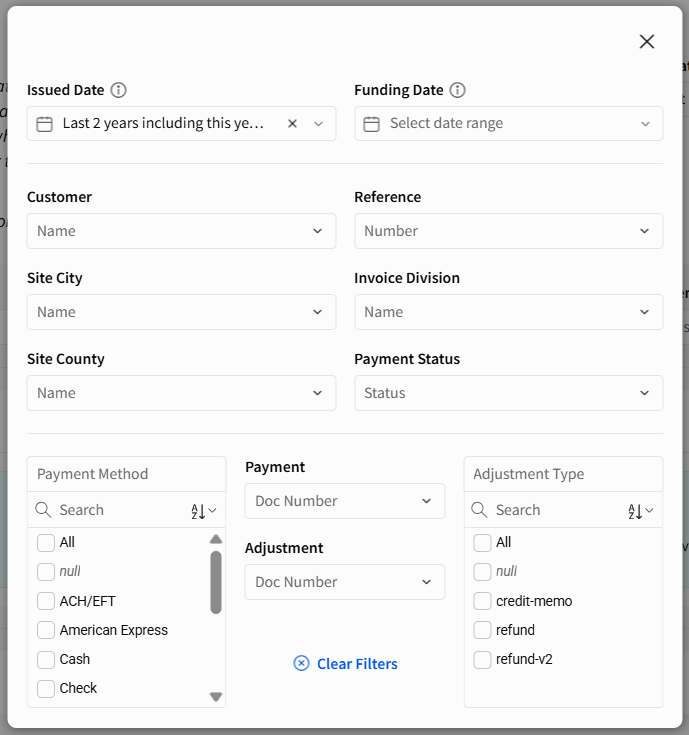
Funding Date: Filter payments by the date funds were deposited or settled. Dates only appear on payment and deposit records for accounts that use the funding sync feature.
Reference: Search by check number or other payment reference Number.
Site City: Filter by the city of the job or service location.
Invoice Division: Narrow results to payments applied to invoices in a specific division.
Site County: Filter by the county of the job or service location.
Payment Method: Filter by payment type, such as credit card, check, cash, or ACH.
Payment and Adjustment: Filter by Doc Number.
Adjustment Type: Limit adjustment results to credit-memo, refund, or refund-v2.
Expand or Collapse Details in a Table
Several tables in the report list high-level totals first and keep the details underneath. Account Type, Payment Details, Group by Invoice, and Payment Adjustments all work this way.
To see more details, click the “+” icon next to a row to expand it. For example, expanding an invoice in Group by Invoice shows the payments applied to it. Click the “-” icon on that same row to collapse it back down.
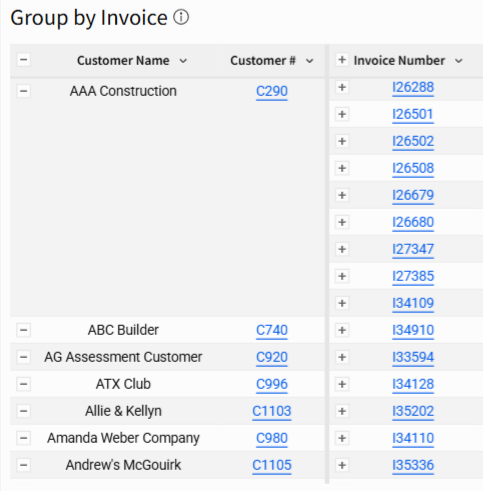
TIP: Click the “+” or “-” icon in a column header to expand or collapse every row at that level at once, instead of one row at a time.
Sort a Section of the Report
After using the filters based on your preferences, you have additional options to sort the data that is presented in the different report sections.
To sort the Applied Payment Summary using the options menu:
Hover over a table so a menu appears in the top right corner of the section.
Click the three vertical dots.
In the menu that appears, hover over “Sort.”
Select your “Sort By” preference.
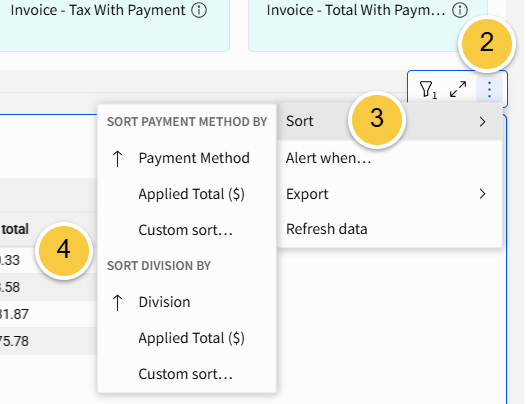
The other tables in the report work a little differently as you use the tables' column headers to sort.
To sort the tables using the column headers:
Click the options icon next to the header.
Select your sort preference or click the gear icon for additional options.
TIP: Each column can be sorted either alphabetically A-Z or Z-A OR numerically ascending or descending. For instance, the Amount column will sort numerically while the Item Name column will sort alphabetically.

Export or Send the Payment Report
Before you export or send a table, make sure it displays the way you want it to be viewed. Only fully expanded rows appear in the exported or shared file.
Export the Report
Once you have a section of your report displaying the information you want, you can download it for your records.
Hover over the section so a menu appears in the top right corner of the table.
Click the three vertical dots.
In the menu that appears, hover over “Export.”
Select your file preference in the list of options that appear in the dropdown and the report will download in the file format you selected.
TIP: When exporting as a PDF, you can choose Portrait or Landscape layout.
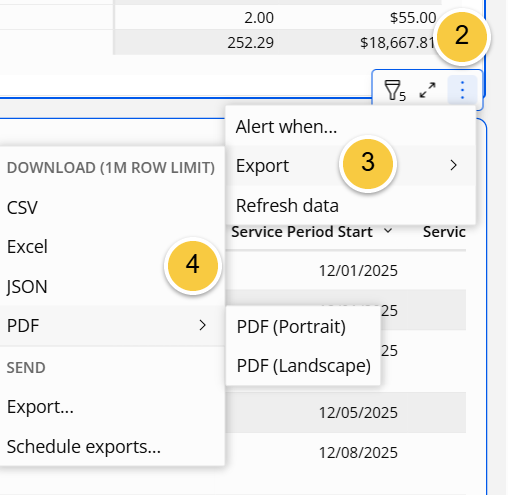
Please Note: You can export up to 1 million rows at a time. If your table contains more than 1 million rows, we recommend using filters to break the data into smaller, exportable chunks.
Send the Report
In addition to downloading a section of the report to your computer, you can also email a section.
Hover over the section so a menu appears in the top right corner of the table.
Click the three vertical dots.
In the menu that appears, hover over “Export.”
Click “Export…” at the bottom of the list under the Send section.
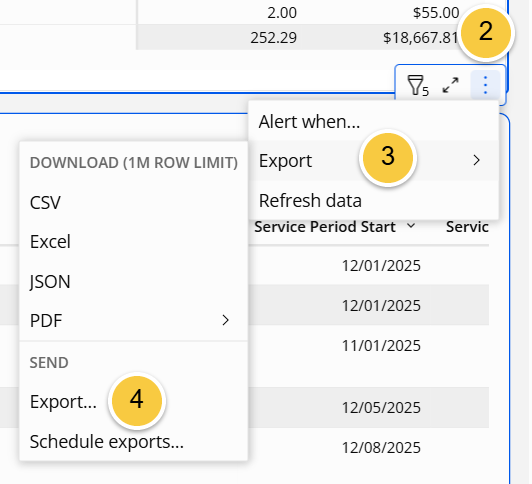
In the pop-up that appears, click the “Email” icon.
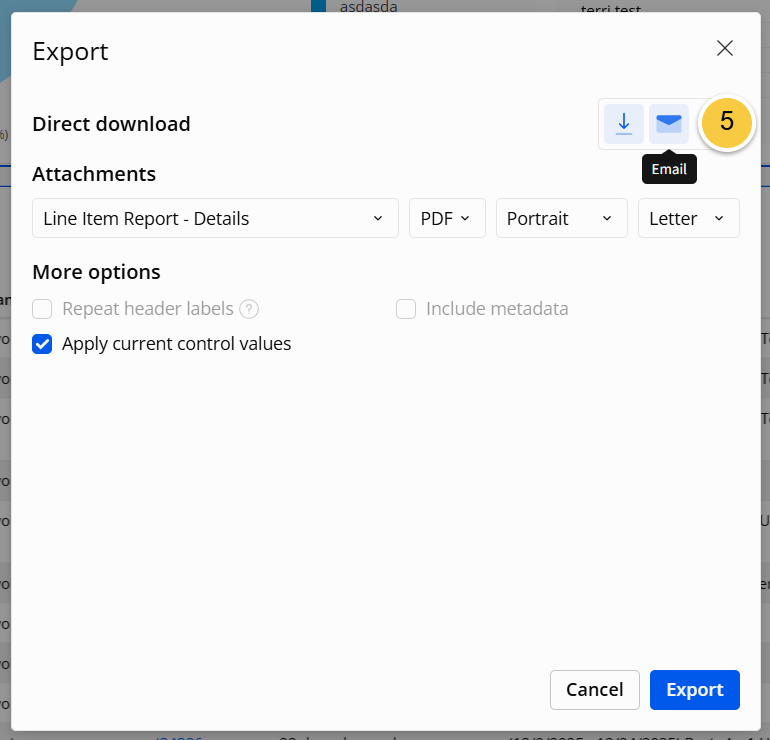
Enter the email address of the recipient.
Click “Export” to send an email with the report attached.

Please Note: On the final screen, you can also customize the email subject, select specific attachments and file types, or send the report as a .zip file.
If you have any questions, please reach out to our Support team through the chat widget on the bottom of this page or by sending an email to support@servicecore.com!